Saturday, January 30, 2010

Things I worked on today for Art Show


As promised I am showing you a few of the things I worked on today for the Art Display.

Our Red miniature cattle dog had to show her off. She is waiting for me to kick/throw the ball .
Eyes on the ball ready set go.

Fungi from the picture I took in our garden. This is to go on the quilt.

3 dimensional fungi to go on quilt.


Log made with felt and wool fungi.

Carol look what I did with your felting method. The log with fungi.

I have not taken a picture of the large piece I am working on that the fungi's will be go on. Well I think that is what I will do with them. When I have it finished I will post the picture.

I have worked most of today on this project and enjoyed every minute.

Keep stitching.

Delia

Friday, January 29, 2010

Flowers in the Sunshine Lesson 3

Lesson 3
3 pictures

Now stipple in any way you like around the edge of the flowers but take in the edge of flowers and leaves here and there to hold them down.

Pic 8
Once you are finished stippling you can now put in the veins on the leaves and the centre of the flowers. Now have a look and see if you want to run a stitch around any of the petals. I do sometimes not always.


Pic 9

Pic 10

When quilting you could stipple as I have or you can make small flowers (pic 10) or any design you like. Flowers look nice.

ATC


This is the ATC I made for a swap last week. I used a zentangle piece to make it. Then covered it with white organza.
Delia
Keep stitching

Fungi


Hi All
I found these great fungi in our front garden a while back and have decided to recreate them in material for a show in March.

I have started then along with other fungi and will post some pictures of what I have been working on soon.

I also found this bug in the garden. Big body about 3 inches long and antlers about 6". Ugly but nice at the same time.
Delia
Keep stitching

Saturday, January 23, 2010

Flowers in the Sunshine Lesson 2

Lesson 2
3 pictures 5,6,7
Place your flowers and leaves in a pattern that you like on to the work.
Pic 5

Once satisfied you may sprinkle some angelina around the outside of the flowers, on some petals or leaves. This will give the piece a nice sparkle
Now take the net and cover your work. As it is a small piece I don’t bother pinning till I have the net on top. (If you are worried you could use a bit of glue to stick the flowers in place) Be careful as the net does catch the work. Once you have it on top place some pins in the leaves and flowers.
Pic 6

Also a few on the top and side edges of the work. Don’t use too many.
Pic 7

Keep stitching until next lesson

Delia

Friday, January 22, 2010

Ginger Gardening Expo


Margot

Yesterday Margot and I went to Yandina for the Ginger Gardening Expo. How lovely the colours of the ginger plants are. I have a few pictures to show you.

We tried the ginger ice cream with macadamia nuts and then later a ginger beer. Of course we could not resist buying some ginger and a few bottles of their ginger products as well as some herb mixes they you put into cream, cottage cheese or yoghurt to make a dip. Tasted so great.
We attended 2 lectures one on floral arrangement not the conventional but where all the rules can be broken.

The next on how to plant a vegetable garden in coolite boxes and have a mixed salad ready to eat in 6 weeks. We found this very useful and informative.

My no dig garden is still great but I had already decided I was going to grow in pots this year but not it will be in boxes thanks to AnnetteMcFarlane.

We have enough water as we have an acre of dam on our property but a lot don't and she had some great ideas to save water when growing vegetables. I am going to try some out.


Keep stitching
Delia

Chutney

BEETROOT RELISH
MANGO CHUTNEY

My girlfriend Margot has been up for a few day and we decided to make Mango chutney as there is a glut of them in our area. So off to my sisters to claim our share of the mangoes instead of the flying foxes. So extended mango extractor in hand boxes and bags off we go. Only the common type here but they are the best for chutney.

Home we came calling in at shop to get vinegar, sugar ginger and dates to go in the chutney.
What a batch we made.

Then we decided to make beetroot relish as we had finished the lot we made before Christmas.
Margot had this in mind before she came up and had brought up 2kg of beets.
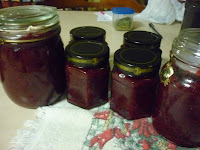
Again the kitchen in a mess and stuff everywhere but a nice brew of relish and chutney.

As if that was not enough the next day off to get Bowen mangoes from a friend of a friend who had trees in her yard but did not eat them. Well we should have been there a week ago as a lot of them had just gone to waste.

Still not enough off we go to raid where ever we could find a tree. It is such a bumper season here that there are mangoes falling off everywhere.

I am posting a picture of my share of the bounty and the Beetroot recipe. This is different and I think most would have a mango recipe if not ask and I will give it to you.
As well as this we made Mango Weiss bars wow are they nice.

Before Christmas I had made two different types of beetroot cake so I will post the recipe here as well. On is a chocolate and beet cake and is so moist and I have kepted it in the freezer for 6 months and still so moist when you take it out. I don't ice the cake but sometimes sprinkle it with a bit of icing sugar before serving.


The other is red in colour and a different texture but is nice and good colour for Christmas again no icing just sprinkle with icing sugar when serving. I forgot to take pictures of these.


Beetroot Chutney
You need:
1.5kg (3lbs) beetroot – cut off stalks
500g (1lb) onions (weight after peeling)
500g (1lb) Granny Smith apples (weight after peeling and coring)
Juice of 1 lemon
2 and a half cups white or cider vinegar
1 level teaspoon ground ginger
1 and a half level teaspoons allspice
A quarter of a teaspoon ground cloves
2 teaspoons salt
500g (1lb) sugar - this could be reduced to 375g (12oz) if preferred
Method:
Place beetroot in a large pot and cover with water. Bring to the boil and cook until beetroot is tender (test with a skewer – cooking time will vary with the size of the beetroot).

Drain then leave to cool until able to be handled. The skin should now easily peel from the beetroot. Cut off the stem and stalk end.

Grate the beetroot coarsely.

Chop the onions and apples finely.

Place the onions, apples, lemon juice, ginger, allspice, cloves and salt in a pot with the vinegar, then bring to the boil and simmer for 15 minutes.

Add the grated beetroot and sugar and bring back to the boil, stirring.

Cook until the mixture thickens to a chutney-like consistency (about 45 minutes).

Pour into warm sterilised jars and seal immediately.

Beetroot Chocolate Cake

Beetroot you will need 2 cups of fresh cooked beetroot, mashed.
Bowl 1
Place 2 cups of mashed beetroot in a mixing bowl and then stir thoroughly through 2 teaspoons of vanilla essence
Bowl 2 (larger of the 3 bowls)
In a second bowl beat together thoroughly
2 cups of white sugar
1½ cups of vegetable oil
4 free range eggs
Bowl 3
Sift together
2+1/2 cups of Plain Flour
2 teaspoons of Bicarbonate of soda
2 teaspoons of salt
1/2 Cup of Cocoa
Incorporate the beetroot mixture and the flour mixture alternatively into the egg mixture and stir well until all combined.
Grease and line your prepared tin, pour the mixture in and bake in
180Âșc pre-heated oven for about 45 minutes. The more moisture in the beetroot the longer the cake will take to cook.
Decant after 5 minutes out of the oven. Ice with you favourite icing or dust with icing sugar.

Beetroot Cake 2

For a dense, moist, flavoursome sweet beetroot cake, combine 2 cups peeled, grated raw beetroot with 2 tablespoons canola oil, 6 egg whites, 3/4 cup buttermilk and 1/2 cup maple syrup. In a separate bowl, combine 3 cups flour, 2 1/2 teaspoons baking powder, 1/2 teaspoon baking soda, 1/2 cup granulated sugar and 1/2 teaspoon each cinnamon, nutmeg and ginger. Make a well in the dry ingredients and stir in beetroot mixture until just blended. Spray a 22cm loaf tin with oil and bake at 180°C for 50 minutes to an hour, or until a cake skewer inserted in centre comes out clean.

So as you guessed not sewing done these days. Usually we are up untill 2 - 3am sewing. Well we did enjoy what we did and today we went to the Ginger Flower expo so again not sewing got done. I will post these pictures tomorrow as I am to tired now.

Goodnight and keep stitching.

Delia

Thursday, January 21, 2010

Disappearing 9 patch


Yesterday was the first meeting for the year of our Stitch and Bitch group.
Of course lots of bitching but not much stitching done.lol
My friend Lynn had compleated two disappearing 9 patch quilts over the Christmas season and one she had appliqued flowers all over it. Quit stunning.

The other is a flannel quilt and so soft and cuddle.

Keep stitching

Delia

Monday, January 18, 2010

I'm still doodling.


Oh the zentangles seem to have me hooked. I have to get out to the studio and do something else. They really are additive and CAROL thank you for showing me how to do them.

These are two I did last night to go into frames. I made them to big so have to cut off the sides and top. Not to worry now I have some for a couple of ATC. Maybe that is what I should start with today.
Link to how is done

Keep stitching or doodling
Delia

Friday, January 15, 2010

Zentangles


Oh
Carol you have me hooked on these little things. I can draw nowhere are nice as you do but I have managed to do a few.
Here are my first attempts. I have to say it is additive and time consuming.lol
Keep stitching or should I say
scribbling.
Delia


Flowers in the Sunshine Lesson 1

Lesson 1
5 pictures
Match your paint colour to your felt colour.
1. Painted on visoflex 2. painted on visoflex
3. painted on heat and bond

Examples of colours to use
Pink felt - Bright pink mauve touch of yellow magenta
Green felt - Yellow light brown and green
Yellow felt - Green brown and orange
You can chose what you think will look nice to your eye.
Paint the vlisoflex or heat and bond on the rough side with your paint. I water the paint down to about ½ and ½. You can even water down more if you like but not so it is dripping wet.
Do not mix the paint on the vlisoflex as you will end up with mud. Just wipe it over in one stroke then the next colour. Till you have it covered
Allow to dry thoroughly.
You will get different designs on the fusible webs. You never get the same.
Now place the rough side (painted side) on your felt and iron with a dry iron. Be careful not to get any on your ironing board or iron. You can use baking paper under and over to stop this.
Leave till cool (overnight if you like) then pull the paper off. It does not matter if some of it lifts off it will add character to the piece.

Pic 4 Heat and bond piece after paper pulled off.It becomes shiny.

Pic 5 Vlisoflex piece after paper pulled off.

Monday, January 11, 2010

Flowers in the Sunshine

Smileycons!I have decided to post in a series of postings my class Flowers in the Sunshine.
If you would like to do this project come back each week for the next class.
I would appreciate it if you let me know in the comments who would be interested in making this little project.
It will run over 4 weeks starting next week. Flowers in the Sunshine Class
Requirements
Please read all lessons before you start to work.
A4 (11.5” x 8.5”) size piece of felt (don’t get a really fluffy one)
Black net 1” larger then felt
Vlisoflex (paper backed fusible web) or heat and bond 1” large then felt
Binding and backing fabric
Angelina in colour of your choice
Fabric Paint I use Jo Sonia but any will work
Silk flowers and leaves of your choice pull these apart taking all stamens and plastic off back of the silk flower and leaves. You may pick any type of flower you want but don’t make them too big or bulky.
Motif of something like butterfly if you like to use
Beads of your colour choice to finish
Metallic Machine Embroidery thread I like to use hologram as it is flat and not round and does not break as easily.
Metallic or Embroidery needle. They have bigger eyes.
I usually sew straight onto the felt but if your machine will not sew on this use a tearaway, vilene, or shapewell. I use shapewell.
Sewing machine in good order and able to drop the feed dogs.
Usual sewing needs and cutting mat and cutter.

Tips for a Domestic Sewing Machine

My friend Neroli has written a great tutoral for quilting on a Domestic Sewing Machine.
I have put the first tip here for you to read.

TIPS for quilting on a Domestic Sewing Machine.
1. Make the work surface slippery! this helps the quilt to glide and means you don't have to support it's weight yourself.
There are a couple of ways to do this:

  • Use a spray like Mr Sheen liberally. I apply a few heavy coats over my entire sewing desk and leader table. I even apply it around the base of my machine being careful to apply to a rag first so it doesn't get inside the machine.
  • Tape a teflon sheet or a commercial self adhesive quilting mat to your work area. (Sew-slip is one that springs to mind). If you use teflon cut a small hole in for needle clearance.

2. Take up the weight! If your quilt is large make sure you have something to your left to take up the weight,

For the remainder of the information click the link below.

http://eiloren.blogspot.com/

Sunday, January 10, 2010

Christmas and New Year


We are home again after 3 weeks away. We spent two weeks with our daughter and her family in Townsville. It is the first time in years that we have been able to spend Christmas with them and having the children made it so special. Lily is 3 today the 11th and Jack will be 2 on the 3rd April.

Jack on the motor bike having fun.

Here the little ones are on the 6 volt motor bikes we gave them for Christmas. We could not have given them any thing better. They played for hours on them. Music blaring and horns honking. I think a few people were hoping the batteries would run out.


Lily in the BIG truck at Castle Town.


They loved coming in to our caravan and having biscuits. In a dish they would say and with milk. Biscuits not the usual tiny bread sticks.


Here are the two Nanny's with the grandchildren at the Cowboys Club. The children walked the strand with us. We left at 9.30 in the morning and got home at 5.30 that afternoon. We all had a wonderful day. Tied children off to bed and did not wake till next morning. These two are so seasoned to shopping and going out. My husband could not understand how we could be out with them all day and all come home happy but tired.

Milkshake and shopping but not grocery shopping as Lily says.


This is Lily and myself at breakfast up at the Harvey Ranges.

HAPPY NEW YEAR

Smileycons!

I wish you all a very Happy New Year and hope all your dreams and plans come true.

Last year I told you I would post pictures of a piece that a student made in my PVC class.

Well here they are.

After putting down the paper on the material and painting it with PVC she then added bits of lace, net, silk flowers ,silk, and ribbon. Some of the materials she used were very old and had fond memories for her.

Then after drying she stitched the piece and added embellishments before making it into a wall hanging.

This student is very talented and I have to say just blew me away with what she made with the technique.

Hope you like it.

HELLO I have not posted for a very long time. I could not get into my blog but after an hour finely worked it out. My what have I b...